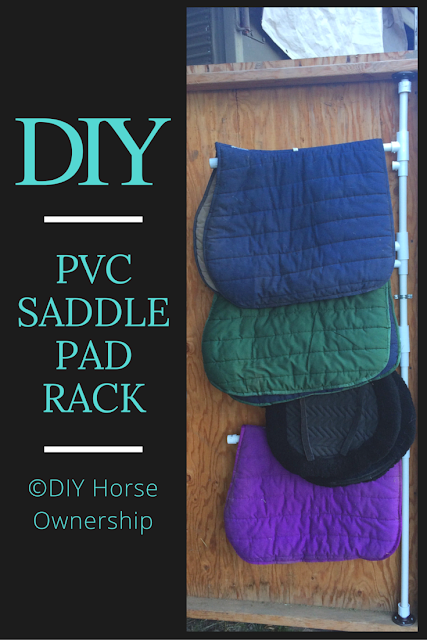
We used to have a chain across our tack room door to dry saddle pads on, but it only held one pad. I thought about attaching some more chains, but the chain wasn’t that convenient. You either had to undo the chain to put the pad on or jam the pad around the chain. I had seen some PVC saddle pad racks on Pinterest, but they were all straight perpendicular from the wall style and I needed the rack to swivel from perpendicular to parallel. None of the ones I saw on Pinterest had any directions for making them anyway, so I had to think up the entire thing from scratch. And the end result is pretty awesome.
Supplies Needed:
7x 2′ long sections of PVC pipe
4x ¾” caps
4x ¾” by ¾” T-shaped 3 way splitter
4x ¾” by 1″ T-shaped 3 way splitter
2x 1″ to ½” PVC reducing coupler with threaded end
2x metal pipe flange with 1/2″ threaded hole (in the metal plumbing section)
1x PVC cutter
1x ¾” metal U-shaped pipe clamp
10x 1 ¼” self-drilling wood screws
Electric screwdriver
Optional: 1 small can PVC “Blue Glue”
1. Put the caps on 4 of your 2′ PVC pipes:
2. Screw your reducing couplers into the metal pipe flanges:
3. Using a PVC cutter, cut 2 of your uncapped 2′ PVC pipes into 1′ sections:
4. If you’ve never used a PVC cutter, they’re very easy to use. Put the cutter onto the pipe and tighten the screw. Turn the cutter around the pipe. Then tighten and turn again. Keep repeating until you’ve cut all the way through.
5. Start with your remaining 2′ uncapped PVC pipe and attach it to one of the ¾ x “¾” T-shaped connectors. Then add a 1′ PVC pipe to the other end. Slide a 1″ x ¾ T-shaped connector onto the short pipe. This piece should be loose on the pipe which will allow it to swivel around the pipe.
6. Keep adding connectors, 1′ sections, and sliding connectors until you have 4 connectors attached. You will need to check your saddle rack in the location you’re going to mount it before you cut your final vertical PVC piece. You might need to make it shorter or longer depending on the height of your ceiling. See the sketch below for the order of your pieces:
7. Try to line up all of the printing on the PVC so that you can place that side against the wall:
8. Using an electric screwdriver, screw the flanges in to your floor and ceiling with the PVC pipe inside. Don’t try to install them without the vertical pipe installed or you won’t be able to get it in after. The vertical pipe should be as tight as possible.
9. Add your 4 capped 2′ PVC pipes into the swiveling connectors. We debated putting the rack on the side of the door with the hinges to reduce warp on the door from the weight of the pads. However, for us, this would have caused the pads to swing open every time we opened the door. We may still end up moving it over. You can see here how we’ve placed the printed side of the PVC against the door so it’s not visible:
10. Add a metal pipe clamp about half way up to keep the vertical part against the wall. Otherwise, the rack will bow out.
11. Add your saddle pads. Swivel.
Optional Steps:
You can add PVC “Blue Glue” to all the joints to glue them together. However, it’s not necessary, everything will stay together so long as you pushed them in tightly.
If you don’t need the swivel function, skip the 1″ by ¾ connector pieces and just attach the horizontal pipes directly into the ¾” by ¾” connectors.
If you can’t mount to the floor and ceiling, you can add a 90° connector at each end and mount the metal flanges directly to the wall.
Related


Great idea!!
I didn't know I needed this until you posted it. OH MY GOD THE POSSIBILITIES.
Very cool!
oooh super clever! great tutorial too
This is very very clever. I am definitely saving this!
What a great idea!!